Welcome to my blog...one stop along a trip filled with inspiration! It is our mission this weekend to share some fab Mother's Day project! Simply leave a comment between now and Sunday at 5:00 PM CST, and you will be eligible to receive this awesome prize pack!
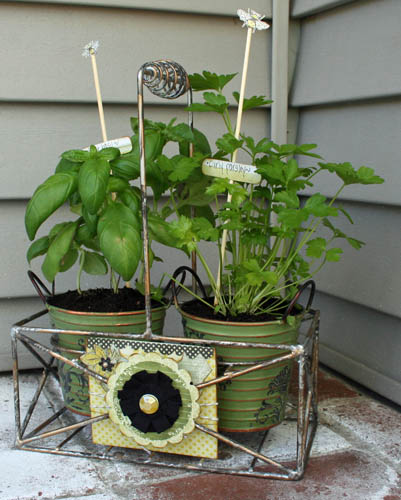
Today, I am sharing a Mother's Day Project that is sure to make any gardener or cook very happy! I love to make handmade gifts and stalk the aisles of my local stores looking for cool things to alter. I had great luck on one such trip and was able to create an altered project complete with a darling gift card holder...think of it as an herb garden on-the-go! I love the fact that the "packaging" is a present all in itself!
Here is it!

Here is how I made it!
First, I purchased the inexpensive metal plant holder at my local Michael's store. It came with plastic pots, so I substituted them with these pretty green, metal ones. They needed a bit of jazzing, so I applied the Bayberry Cottage rub-ons directly on the metal. Stuck with no problem and adds so much beauty. I filled one pot with parsley and one with sweet basil. To finish it off, I stuck a skewer into the pot and topped it with a stamped bee from the Queen Bee collection! A small Punch-out acts as a label! Easy peasy and so pretty!


I wanted to decorate the metal flower box a bit so I dressed it with a simple flower. I layered a Ribbon Pleat flower right on a Punch-out and finished it with a brad. I used glue dots to adhere the flower right to the box.

Tucked behind it you will notice another goodie! It is a custom-made gift card holder. I plan to put a certificate for cooking lessons inside, but you could easily do Bed, Bath & Beyond or a garden store!
Here is the gift card holder:

To make the envelope itself, cut a rectangle that is 8 inches wide X 8 1/2 inches long. Along the 8 1/2 inch side, make score marks at 2 1/2 and 6 inches. Turn the rectangle and make score marks at 2 and 6 inches. Fold along the lines. Then, cut off the the top left and right sides along the folds. Cut the middle portion as well about an inch lower than the fold. Cut off the bottom left and right portions along the folds. This is what you end up with:

Fold the two outside flaps in to the center. Place adhesive on the bottom flap that is facing you and then fold up to stick together the bottom and the two flaps. You will have an envelope complete with a little pocket!

I decorated it with two Punchouts from the Queen Bee collection, handcut a blossom and added an alphabet! Viola! A handmade gift!
Here is the project again!
(Supplies: Queen Bee paper collection, Ribbon Pleats, Bella Brads, Stamps & Punchouts, Expression Licorice Alphabet, Bayberry Cottage rub-ons all from Pink Paislee)
Don't forget to visit the other fabulous Pink Paislee design team member's blogs for a chance to win the awesome prize pack! I know you will pick up inspiration along the way!
Danielle: http://www.danielleflanders.blogspot.com/
Lisa: http://www.coleland.blogspot.com/
Ania: http://www.ania.blogspot.com/
Leena: http://www.findingnana.com/
Jana: http://www.frommyfeatherednest.blogspot.com/
Amanda: http://www.amandamuirhead.blogspot.com/
Kristen: http://www.scrapinkris.blogspot.com/
Tina: http://www.tinaalbertson.blogspot.com/
Jen M.: http://www.jenniferann75.blogspot.com/
Erin: http://www.erinterrellclarkson.typepad.com/blog
Kayla Aimee: http://kaylaaimee.typepad.com/
Happy travels!