Showing posts with label master bathroom renovation. Show all posts

Sunday, July 21, 2013

At Home: Master Bathroom Details

They say its all in the details!  They don't realize that sometimes those details can make a girl nuts.  Making sure everything ties together can be tough.  That is when Pinterest comes into the picture. 

When designing the master bathroom, I knew what color cabinets I wanted and what style I was shooting for.  I wanted a vintage feel to the bathroom while still maintaining practicality.  To help me shop, I made a mood board of some of my favorite colors and trends.  I shared this once, but will share again.  Soft yellows and greens were a must for me.

 
Here are these details in action.

 
I went with rectangular sinks from Kohler.  They are really beautiful, deep and add a pretty touch to the counters.  My faucets are Portsmith from American Standard.  I love the vintage feel.
 
 
I found the little silver tray on the clearance rack at Target for $8.00.  The vase of faux roses was pricey, around $25.00 at Home Goods, but it is really pretty.  I love to look at it each day.  The small perfume decanter is an antique I picked up when shopping with my sister, Sara.  The pulls on the counters are from Lowe's and I couldn't love them more.  They are weighty without a hefty price tag.


We decided to not build a closet in this space as I have a pretty good size one in the other full bathroom, and it didn't fit the layout.  However, I knew that I needed storage.  We had a duct to deal with right behind that black shelf.  It wasn't too deep, but definitely stuck out.  Our solution was to build a tower to go in front of the duct.  After searching for options, I found this great bookcase (Stockholm) at Ikea.  No building from scratch was needed.  The baskets hold my medicines and little glass jars hold soaps and cotton swabs.

Here is a story, a mishap that was a blessing in disguise.  I purchased the bookcase believing it was all black.  My contractor put it together while I was at work.  I was surprised to walk in and find it two toned.  After looking at it with open eyes, I realized that it gave the bookcase depth and allowed me to bring in different wood tones.  It also matched nicely with the River White granite.  To make the bookcase appear to be built in, we finished it off with a kitchen panel from Ikea.


I found this antique-looking shelf at Home Goods.  I figured it could hold towels and add some black to the room.  I love that it had number plates, one for each member of my family. I placed baskets of lotions, and soaps as well as towels and a spa brush on the shelf.  I like to have my vignettes tell a story.  It helps me to decorate.
 
 
See the art?  I made it using a book that included many illustrations of flowers.  I simply ripped out the illustrations I loved best and framed them, placing them all around the room.  It is an inexpensive way to create art that perfectly fits your décor.  That print only cost $6.00.
 
 
We decided to place our toilet behind a pony wall and I am so pleased with that decision.  Had we not, you would have walked in to the sight of the potty.  My contractor built it and finished it off with a pretty shelf with detailed moldings.  See the art to the left of the pony wall?  I made that using the same flower book as above.  The print above the toilet was a Home Goods find.


And the floor.  My contractor was so proud to show me and I couldn't have been happier.  I love the warm contrast of the floor with the lightness on the cabinets and walls.  It really grounds the space.  I decided to go with gray grout to really have the herringbone pattern pop!
 
I adored creating a room from scratch.  Making a mood board with all of my thoughts really helped me to make decisions and know what I was shopping for.  A little creative DIY projects using frames and illustrations helped me to fill up wall space in a cohesive way.
 
Life really is in the details.


Sunday, July 14, 2013

At Home: Master Bathroom Renovation Complete

Happy Sunday everyone!  Today I am going to share the completed master bathroom renovation!  We are so happy with the final outcome.  It is my favorite room in the house.  I designed this room to be peaceful and serene. It is an odd shape because we combined two rooms, but I think the final design makes good use of the layout!

To see the before pictures, head to this post.  It is really dramatic.

The view from the bedroom door.


I will share the shower with you another time.  It is amazing!  Right now, it is covered by a curtain.  The plan is to put in beautiful, frameless glass doors.  We will get there soon. The floor is one of my favorite design elements.  It is tile from Lowe's that we placed using a herringbone design.

This vanity wraps around the other side of the L-shaped room.  When my contractor and I were going through the room prerenovation, we were having trouble figuring out the vanity placement.  We brainstormed this and then I worked with the kitchen guy from Home Depot to create the vanity.  It is just as I imagined. Steve and I have our own spaces to get ready.


My side of the vanity shows some more details.  We went with tilt mirrors and schoolhouse lights.  There is no closet in this room so having enough storage was key.  I created the nook to hold towels.  It is empty right now, can you tell I have to do laundry? The basket holds extra rolls of toilet paper.


This is the view of the opposite wall.  We built in the shelf from Ikea and it looks so good.  I have my medicines and other things in the baskets and jars.  We built a pony wall to create privacy and to make a divided area.  Now, we have a changing area complete with a mirror that doesn't feel like it is right next to the toilet.


I went with shutters in this room, covering up only the bottom portion.  It is a really nice option as they can be opened for light or closed for privacy.


Another view showing the relationship between the shelf, my side of the vanity and the shower.


I love getting ready each day.  We did Ella's hair and got her dressed for her dance recital in this bathroom. I envision her using the space to get ready for her wedding one day!  A spoil that was truly worth the wait.

Supplies:
Vanity:  Baltic Bay color by Thomasville from Home Depot
Countertop:  RiverWhite Granite
Wall Color:  Gray Owl by Benjamin Moore Aura
Flooring:  Lowe's Porcelain Tile for only $2.48 per sq ft
Grout:  Natural Gray from Lowe's
Shelf:  Ikea Stockholm
Full Length, stand up Mirror:  Lowe's
Shutters:  Lowe's
Mirrors:  Delta from Home Depot
Vanity Lights:  Home Depot

I will be back next week to show the details as well as to share some tips on how you can decorate on a budget!


Sunday, April 7, 2013

At Home: Enjoying the Wait

We are waiting, watching as the last of the renovation job is being completed.  It should only be one more week of dust and paint and grout and design solutions.  It has been a blast to imagine a space, a home and make it come to life!

At home, this week....it looked like this:

Shower is so close to being done...gorgeous tile and granite.  I am in love!


The faucets are waiting to be installed in the countertop...the same countertop that had to be redone.  Yep, one of the sinks was cut off center.  It took us days to notice...our granite guy is great...he fixed it...ripped the first one out and put a new one in.


This week brought running around.  Lots of coffee.


I have been to Ikea three times this month.  Thank god for reasonable prices when a girl needs a renovation solution.  And for the lunch counter...


It brought character dress up day at school.  I am glad my kiddos are still into this.  Life with changing kids has been interesting to say the least.  Sometimes, I just want them to stay young and innocent!


This week has been full of challenges and blessings.  I am very grateful!


Sunday, March 24, 2013

At Home: Powder Room Renovation

Home sweet home...we are well on our way through the renovations of two bathrooms.  One is the downstairs half bath/laundry space and one is the master bathroom.

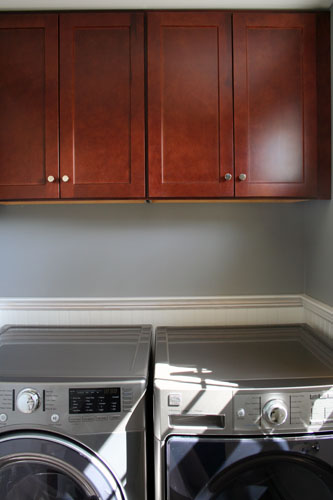
I am happy to say that the downstairs half bath is just about done.  The dryer needs a little easing into its spot and I plan to install a counter above the new washer/dryer.

Here are some images of the new room.


We kept the same footprint, but everything else including the floor and all fixtures are new.  We installed the beadboard and I painted the top half of the room Storm by Benjamin Moore.  It is a lovely deep gray!

I purposefully looked for a bold print with lots of color.  Yellow is my accent as you can see with the cafe curtain on the window.  I will be back soon to explain how those were made!


This is the opposite side of the room...I went with warm wood cabinets because gray and chrome can be cold.  I tied the wood into the other side of the room using the two small shelves.  Love these new washer and dryers.  They sound like spacecrafts when they are running!  There will be a counter across the top...then I will have to shop for more decorations!


I so love this pedestal sink.  It is the Archer model by Kohler and my faucets are American Standard.  I like a modern country mix so I went for a vintage feel.  I love my vanity lights, a real find at Home Depot for only $80.00.


The pretty faucets...Portsmouth from American Standard!  I added the towel and soap pump from the new Threshold line at Target.  Like I needed another reason to shop there.

I love the bathroom and how it updates the downstairs!  The master bath is about halfway done...and we are getting excited!

Thanks for stopping by!


Sunday, February 24, 2013

At Home: Master Bathroom Renovation

I have waited for two years...lived in a dark, cramped space, dreamed every day of what a new space would look like.

We have arrived!  The master bathroom renovation is happening.  Like many renovations, we opened the walls and floors and found a ton of problems.  So the past two weeks have been all gutting, fixing, building pipes and installing electricity.

Our house belonged to my mother and father in law for many years and they ran a home day care center out of the great room.  There was the original, galley style full bath and then a changing room behind it.  We decided to make it into one, large master bathroom.

Before:

The view from the bathroom looking into the bedroom...old shower stall.


During:

We removed the shower and linen closet completely to open up the space.  The door will be made larger and the wrap around vanity will start on this wall and continue around the L into the next space.


Before:

Old shower is on the left and then there was a doorway going into the changing room.


During:
Standing in the same place.  The large shower will go where the sink and toilet were.  It is already being framed out below.  We love how the space opened up.


This was during the gut when the wall where the shower sat was still up. 


New shower will be here where the toilet was. That doorway to the hallway will be gone so the only way in will be through our bedroom.


It is very fun to see it all gutted and ready to go!  This is what I am hoping for when it is done.  I picked gray vanity cabinets like this image:


I wanted to do Carrara marble, but it stains easily and I need practical.  So I am going with River White granite.  It has gray and brown in it, which will match the floor.  Here is an example of the granite in a bathroom.  


Here is my inspiration for the shower.  I got large Carrara-like marble for the walls.


My flooring looks like wood, but is actually tile.  I am going with walnut for a contrast.  This tile is sold at Lowe's for $3.00 a square foot!  This is what it will look like.


Here in an inspiration board with my actual faucets, lighting, mirrors, tile for the shower floor as well as some ideas for how to add color and texture.

I am still wondering about wall color and if I should pop with yellow, coral or green.  What do you think?

I can't wait!  We are also renovating the downstairs half bathroom so I will be back to share the gut and inspiration next week!


LinkWithin

Related Posts Plugin for WordPress, Blogger...