Showing posts with label at home. Show all posts

Sunday, May 4, 2014

At Home: Pop Star Party

Happy Sunday!  We celebrated Ella's 8th birthday yesterday with a very fun Pop Star theme party!  There are so many good resources on Pinterest for finding amazing ideas for party décor, games and food!  I lifted them and interpreted them so the ideas worked within the supplies I could find!

Here are some shots from the party!


I went with a blue, pink and black color scheme, mixing in other brights like yellow, purple and green in very small doses!  I love to set the table when I have a party.  It creates a very festive feel! 
 
 I made a centerpiece using traditional star bursts.  I got both at the dollar store.  I also bought packages of the silver stores from the dollar store and Party City.  To make the dimensional one is the center, I folded two stars in half.  The I placed the fold back to back and stapled!  So easy and the stars then stood upright.  I added confetti and that fun inflatable microphone that I got from Oriental Trading!


I also love to set up a dessert table!  I added several silver stars around the backdrop, taping some to the wall and hanging others from the ceiling.  They were kinda boring so I added the crepe paper circles to the middle of each large star.  I got them from the cupcake toppers as shown in the picture below.  I already had the pink paper lantern so I added it in to make is seem like a disco ball!  No joke, the backdrop probably cost under $15.00.
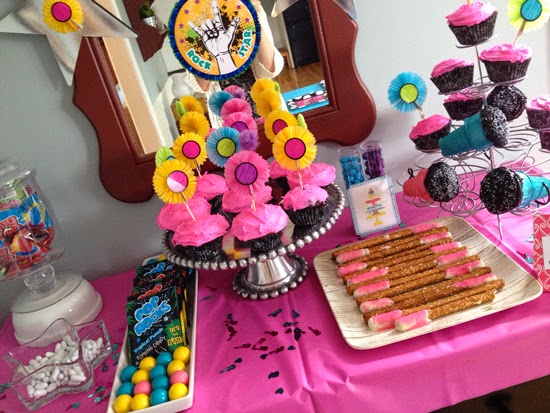


We found this Rock Star badge at the dollar store!  Score!  I hung it right above the cupcake tray.  I filled jars and plates with Ring Pops, Pop Rocks and gumballs.  All items from either Oriental Trading or the Dollar Store.  I used bright pink frosting for the cupcakes and topped each one with a brightly colored topper.  I got these from Party City and they helped me solidify the color scheme.
 
 
I found a really cool idea for a different type of cupcake while browsing Pinterest!  You can make microphone cupcakes using colored sugar cones, a cupcake inserted into the top, dark frosting and string licorice for the "wire".  My niece, Jesse, made these for me and they came out so great!  She got the cones at Walmart!  She also filled the inside of the microphone cones with candy.


I also dipped pretzels into chocolate and called them Drum Sticks!
 
 
As each girl entered, she received a VIP pass!  I lucked out and found these at Party City.  They are really invitations, but I cut them.  I only needed one package...for $8.00, they were worth it.  The plastic badges and strings were found at Oriental Trading.

 
Each girl also had the chance to decorate a paper guitar, found at Oriental Trading.  They loved this station at the party!  Ella came up with the idea to have every girl sign her guitar!


We had a Pop Star hair and make-up station where the girls could put on tattoos. They also had their hair sprayed with pink or purple strips. Each star got a inflatable microphone and sunglasses! Then we were ready for karaoke! I can't tell you how many times they sang, Let It Go. The smiles sum it up though!
 
 
This pop princess had a blast!  It was a fun party!


Sunday, December 1, 2013

At Home: Thanksgiving Decor and More

We had our favorite day of the year this past weekend, Thanksgiving!  Our annual deep frying turkey get-together was in full effect by 7:30 in the morning!  This was our 17th year and the celebration gets better and better.  Not only do we host the party, but we also host our family dinner. 

While Steve is prepping the outdoors, I take care of the inside.  I set the table using a variety of collectibles from my house as well as natural items.  Here are some glimpses:

 
We seat 18 people for dinner and I love when all of us can be together.  I have to use my living room as the setting.  I line up three tables in order to accommodate everyone. 
 
I use Steve's grandmother's dishes.  They are simple treasures and it reminds us about family.  I use simple white paper tablecloths on the tables.  Then I run burlap down the center.  It adds a lot of texture.  I buy the rolls of burlap at Michael's. The candle holders are from Ikea, super inexpensive.  By using two sets, it makes the table feel rich. 


Obviously, seating for that many people can be an issue.  I use my couch as seating for 4 people.  I then mix chairs from all around my house.  It looks eclectic and comfortable.


This year, I wanted to put out other decorations to fill in the long center of the table.  I put real cranberries into a bowl and topped it with a candle.  I brought in my rooster from the kitchen as a centerpiece.

 
I also added these long white dishes, also from Ikea.  I filled them with dried green peas.  I placed a medium pumpkin and some Indian corn on top. 

Outside, it looked like this:


We deep fried 13 birds this year so we needed double fryers. 

 
This was the first bird of the day, which promptly gets carved and eaten by the partygoers.  There is nothing like crispy deep fried turkey! 


The crowd was full of family and many friends who are like family members.  Many friends have attended since the tradition started.
 
It truly is our favorite day of the year.

 
I am very grateful!
 

Sunday, October 20, 2013

At Home: EntryWay Update!

After taking care of some big renovation projects, I decided to tackle a smaller area this summer and fall.  Our entryway!  It needed some freshening!

It involved this:


A beautiful shade of yellow, inspired by Young House Love.  It is bright and vibrant and just glows!
 
It covered up my black front door.  Here are some before shots:

Before:

 
Before, the door was painted black.  Our stair railing was a light oak and the stairs were painted with a tan color.  The old runner had loads of use with the previous owner so it was in rough shape.
 
 
I had my gallery wall and my entryway table, plus the new tile on the floor.  But the runner was old with a floral pattern.  It was very pretty, but I wanted a new look! Here is what it looks like now.

After:

 
The door adds so much life to the space!  It looks fantastic from the outside too!  I painted that little table with the lamp a turquoise blue to accent the black and yellow.  It adds a punch of color!

 
I added a geometric print to the stairs, black and white diamonds.  It was inspired from Pinterest, of course.  All of the ones I saw on Pinterest involved outdoor carpet, but I wanted something more lasting and sturdy!  I found this beauty and was hooked.  The space looks cleaner now!

 
I painted the old oak railing black to give it a more modern feel.  It really changed the space immediately!

 
Here is a close up of the stair runner.  It looks bold and graphic and welcoming!  I love when a space comes together!


Sunday, September 29, 2013

At Home: Boy's Room Update

For months, I walked by Nathan's room and wanted to change it.  Some of the furniture was too bulky and the color scheme just didn't fit.

We started brainstorming what he might like.  He wanted baseball and maps.  I thought those two things could work together.  I pinned a ton of inspiration!

My first goal was to add stripes in order to update the light blue wall color.  I like it, but it was too much.  I wanted to make it a space he could grow into as he gets older.

The results:

 
The light blue was already on the walls.  I updated it with the gray paint on the top and the navy and orange stripe.  Stripes are not easy.  Frog tape and all.  I had a ton of leaks and squiggly lines on my first coat.  Then I researched how to add stripes using a sealing technique.  It worked like a charm.  It is extra work, but was worth it. 

 
It is a small room with only one window.  So space planning is key.  I wanted a small desk that fit the space nicely.  I got this gray beauty from Target, online only. 
 
I originally wanted a vintage roll down map.  Boy, are those expensive.  Then I started looking online for other options.  Most were $75.00 plus dollars.  As the start of school got closer, I realized that I should check the teacher's store.  I scored that world map for $20.00.  It is perfection!
 
 
This is a gallery wall that I made using Target frames and my scrapbooking supplies.  Seriously, the whole thing cost $25.00.  I will be back soon to share some detail shots!  The art helped me bring in colors I wanted to emphasize.
 
 
This is his baseball and sports area.  I hung the key hook up and decided to use it to display his sport's medals.  It adds to the wall without being overwhelming.

 
His bed area displays his baseball pennants. I combined different bedding, going with a gray and white striped comforter from Target along with orange and white sheets.  I love mixing bedding! 
 
He loves his room and has thanked me so many times.  Now when I walk by, I am just happy. 


Sunday, September 8, 2013

At Home: Great Room Updates

Happy Sunday everyone!  The past year has brought many changes to our home.  We have renovated and painted, relocated items and added layers to each room.

Today, I am sharing some updates we have made to our great room.  It is a nice space, roomy and full of light.  My kids basically live in this room!

When we moved in, we totally gutted this room!  I decorated it once right after our big renovation.  Here is the room before the updates:

Before: 


Now:


Many of the elements have stayed the same...paint color, rug, sectional, and TV unit.  


This couch rocks!  Perfect for family living with young children.  When it needs replacing, I may go lighter, but for now...it is just right!  I added some color with throw pillows and patterned lampshades.

 
The main addition to this room is the leather chair.  We had this is our first house, right in the living room.  When we moved here, the chair found its way to the basement, which is fully finished.  It was just wasting time down there.  Steve and I decided to move it up and see if it worked.  We love it in this corner! (Keeping it real...notice the iPhone charger under the chair!)


Here is the other side of the room, which includes a dinette and wet bar!

One of the things I am learning as I decorate my house is that I often have treasures in the rooms around me.  I am learning to shop my own house first and then buy later!  That approach has helped me create a great room that suits my family!


Sunday, August 18, 2013

At Home: Family Room Updates

When I last shared photos of our family room, we were at the beginning stages of completing that room. We had renovated the space completely...to check it out at the very first before stage, go here.

Coming off the renovation, I was using many of the things I had already owned.  Budget is a major consideration.  So maybe rugs went down that weren't my ideal choices.  I think rooms evolve over time. As time has passed, I have been able to switch out the rugs or add in better pillows. Rooms are successful when they have great bones and solid pieces layered with lots of little details that make the space unique to you.  Kinda like a scrapbooking page.

This room gets the most use in the house.  The kids live up there so I wanted to keep it casual and friendly.

Before:


Rust rug was under the small dining table.  The bookcase and wall were not decorated.


I loved the counter area and had that great shelf, which I inherited from my mother-in-law.

Now: 


I changed out the rust rug to put down a tan one.  It has a totally different pattern than the large floral, but is the same color tone.  I really love geometric prints so I wanted to add them to several rooms.


This is the counter area now.  The shelf is layered with finds from Home Goods, Target and flea markets.  I love the Elephant Trunk flea market in New Milford, CT.  So many treasures to be found.  I also get a lot of my signs and other decorations from Big Lots.  They are many deals to be found.


The addition of the gallery wall just happened this month.  I wasn't sure what to put there for the longest time.  I have a ton of gallery walls that are more random and unstructured.  I wanted this one to be symmetrical and linear.  

Want to know a secret?  I made those ten prints using very inexpensive frames from Jo'anns and art prints from this book:


I bought this at Home Goods three years ago and loved the cover.  I decided to tear out my favorite flower prints and frame each one.  The book cost about $8.00 and each frame only cost $2.65 (I waited for the 40% sale).  Making your own art allows you to cater to your existing style and color palatte at a fraction of the cost.


I made sure to lay out all ten prints before hanging.  I wanted to be sure to even space out the ones that showcased one large floral and the ones that showed two skinny ones.  It helped me achieve a balance.  Kinda like scrapbooking.

Next up, I need to get a seat cushion for the bench.  I plan to make one of my own as soon as I decide on a fabric.  Then I think I will be satisfied with this area for a while.

I will be back next week to show how the other side of the room has changed too!


Sunday, August 11, 2013

At Home: Living Room Redo: Red Rug

Well, I did it.  I hemmed and hawed about what color rug would add some pop and youth to my living room.  I love the space and the bones.  I have a lot of cool antiques and eclectic touches.  But I worried that it looked old.  I wanted a geometric rug and touches of bright color to add some personality.

I think I put down five different rugs in five different colors.  I settled on the boldest choice.

Before:

We had a very neutral rug.  It was calm and serene and worked. The Before photos show touches of the fall, when these were taken.


Now:


Before:  


Now:  


Before:  


Now:  


I went with a geometric red and tan rug.  It seems to ground the entire room and pull the red from the floral chair.  I added simple panels to the windows and it really finishes it off.

I also added many little touches of teal with accessories.  The addition of color and pattern made the room have a more lively feel, which matches the personality of our family!

Before:

Our floral chair.  I am not sure I would still have picked this one if I went shopping tomorrow.  However, it is what it is and I want it to look it's best in the room.


Now:


I added the gallery wall and changed out the lampshade.  I also think the panels balance out the floral.

We have unique windows in our dining room and living room as they have shelves built in over the top.  I love them and how I can display some of my favorites things.  How to hang panels became the question. Most decorating blogs tell you to hang curtains wide and high, but I didn't have that option.  The window is huge and I wanted to add panels without spending a million dollars.

I decided to use small, wrought iron cafe curtain rods that went across only the smaller side windows.  It totally works and adds a little black to the window.  I love how black can ground a room..  I still get to display all my letter Ms and some other art I created with scrappy supplies.  I am having a hard time getting a good photo of the windows with the panels.  They are jute striped from Pier 1.  The perfect amount of texture and pattern without competing with the rug and chair.


It is funny...most decorating blogs talk about not using red too much because it can be chaotic.  I decided to go against that because it seems to be just what my living room needed.

Boldness, color, punch, life.


LinkWithin

Related Posts Plugin for WordPress, Blogger...